



[ad_1]
This blog post will show you how you can automate DNS policy management with Tags.To streamline DNS policy management for roaming computers, categorize them using tags. By assigning a standard tag to a collection of roaming computers, they can be collectively addressed as a single entity during policy configuration. This approach is recommended for deployments with many roaming computers, ranging from hundreds to thousands, as it significantly simplifies and speeds up policy creation.
High-level workflow description
Add API Key
Generate OAuth 2.0 access token
Create tag
Get the list of roaming computers and identify related ‘originId’
Add tag to devices.
The Umbrella API provides a standard REST interface and supports the OAuth 2.0 client credentials flow. While creating the API Key, you can set the related Scope and Expire Date.
To start working with tagging, you need to create an API key with the Deployment read/write scope.
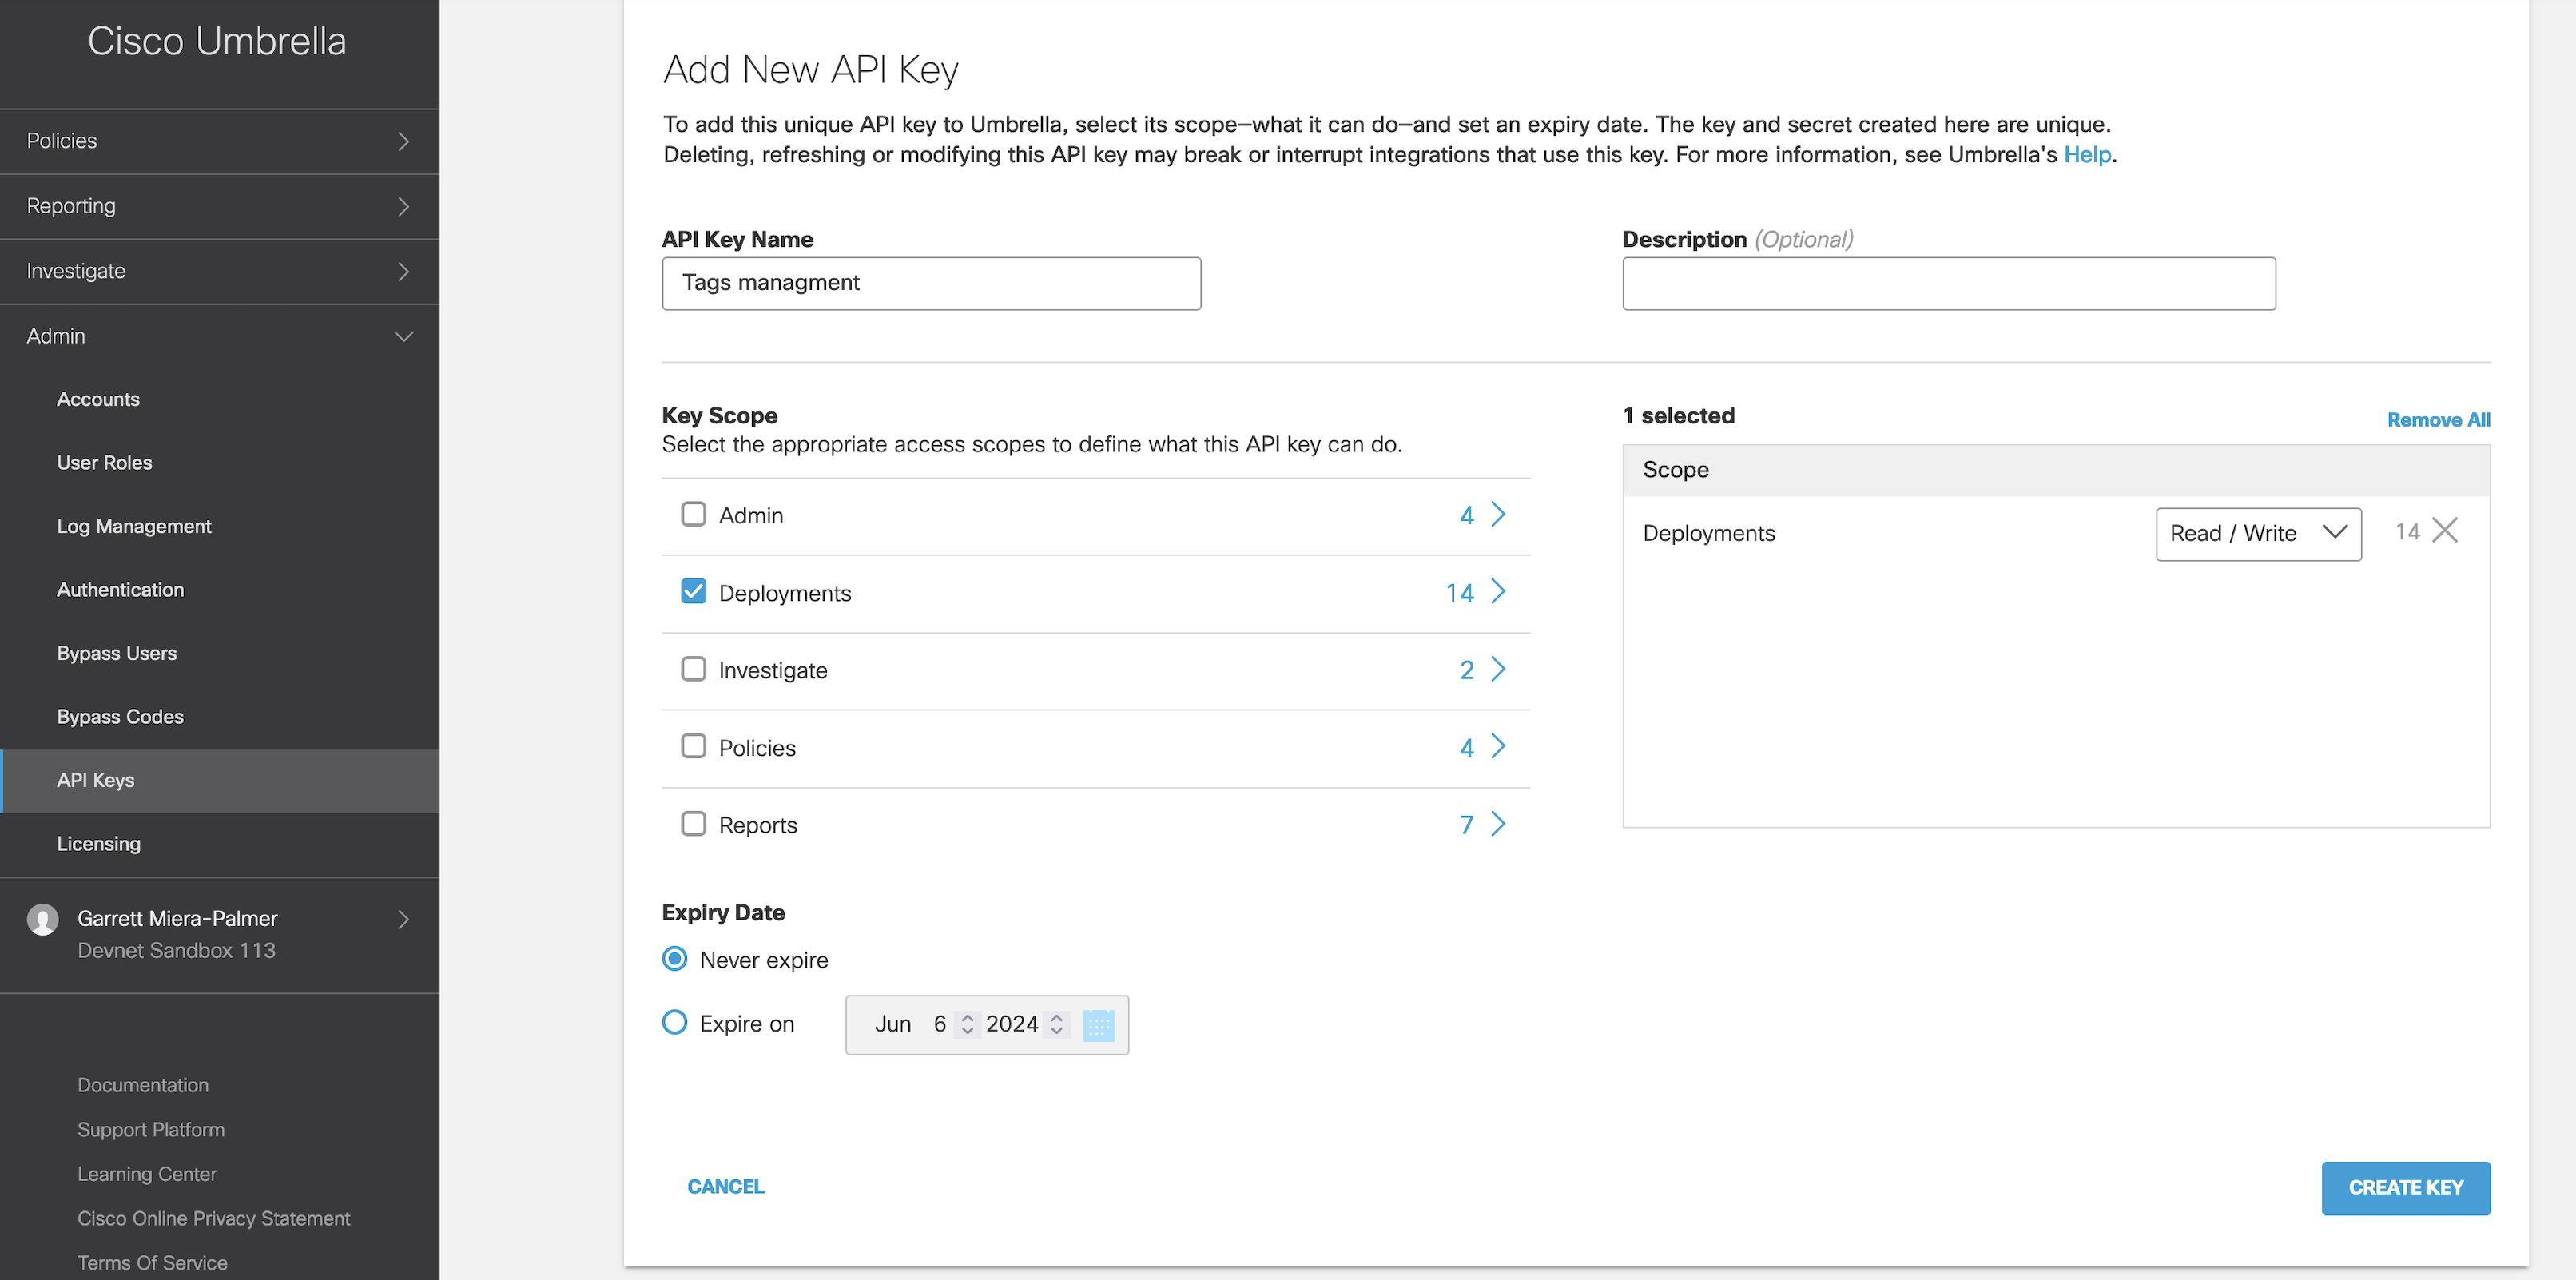
After generating the API Client and API secret, you can use it for related API calls.
First, we need to generate an OAuth 2.0 access token.
You can do this with the following Python script:
import requests
import os
import json
import base64
api_client = os.getenv(‘API_CLIENT’)
api_secret = os.getenv(‘API_SECRET’)
def generateToken():
url = “https://api.umbrella.com/auth/v2/token”
usrAPIClientSecret = api_client + “:” + api_secret
basicUmbrella = base64.b64encode(usrAPIClientSecret.encode()).decode()
HTTP_Request_header = {“Authorization”: “Basic %s” % basicUmbrella,
“Content-Type”: “application/json;”}
payload = json.dumps({
“grant_type”: “client_credentials”
})
response = requests.request(“GET”, url, headers=HTTP_Request_header, data=payload)
print(response.text)
access_token = response.json()[‘access_token’]
print(accessToken)
return accessToken
if __name__ == “__main__”:
accessToken = generateToken()
Expected output:{“token_type”:”bearer”,”access_token”:”cmVwb3J0cy51dGlsaXRpZXM6cmVhZCBsImtpZCI6IjcyNmI5MGUzLWQ1MjYtNGMzZS1iN2QzLTllYjA5NWU2ZWRlOSIsInR5cCI6IkpXVCJ9.eyJpc3MiOiJ1bWJyZWxsYS1hdXRoei9hdXRoc3ZjIiwic…OiJhZG1pbi5wYXNzd29yZHJlc2V0OndyaXRlIGFkbWluLnJvbGVzOnJlYWQgYWRtaW4udXNlcnM6d3JpdGUgYWRtaW4udXNlcnM6cmVhZCByZXBvcnRzLmdyYW51bGFyZXZlbnRzOnJlYWQgyZXBvcnRzLmFnZ3Jl…MzlL”,”expires_in”:3600}
We will use the OAuth 2.0 access token retrieved in the previous step for the following API requests.
Let’s create tag with the name “Windows 10”
def addTag(tagName):
url = “https://api.umbrella.com/deployments/v2/tags”
payload = json.dumps({
“name”: tagName
})
headers = {
‘Accept’: ‘application/json’,
‘Content-Type’: ‘application/json’,
‘Authorization’: ‘Bearer ‘ + accessToken
}
response = requests.request(“POST”, url, headers=headers, data=payload)
print(response.text)
addTag(“Windows 10”, accesToken)
Expected output:
{
“id”: 90289,
“organizationId”: 7944991,
“name”: “Windows 10”,
“originsModifiedAt”: “”,
“createdAt”: “2024-03-08T21:51:05Z”,
“modifiedAt”: “2024-03-08T21:51:05Z”
}
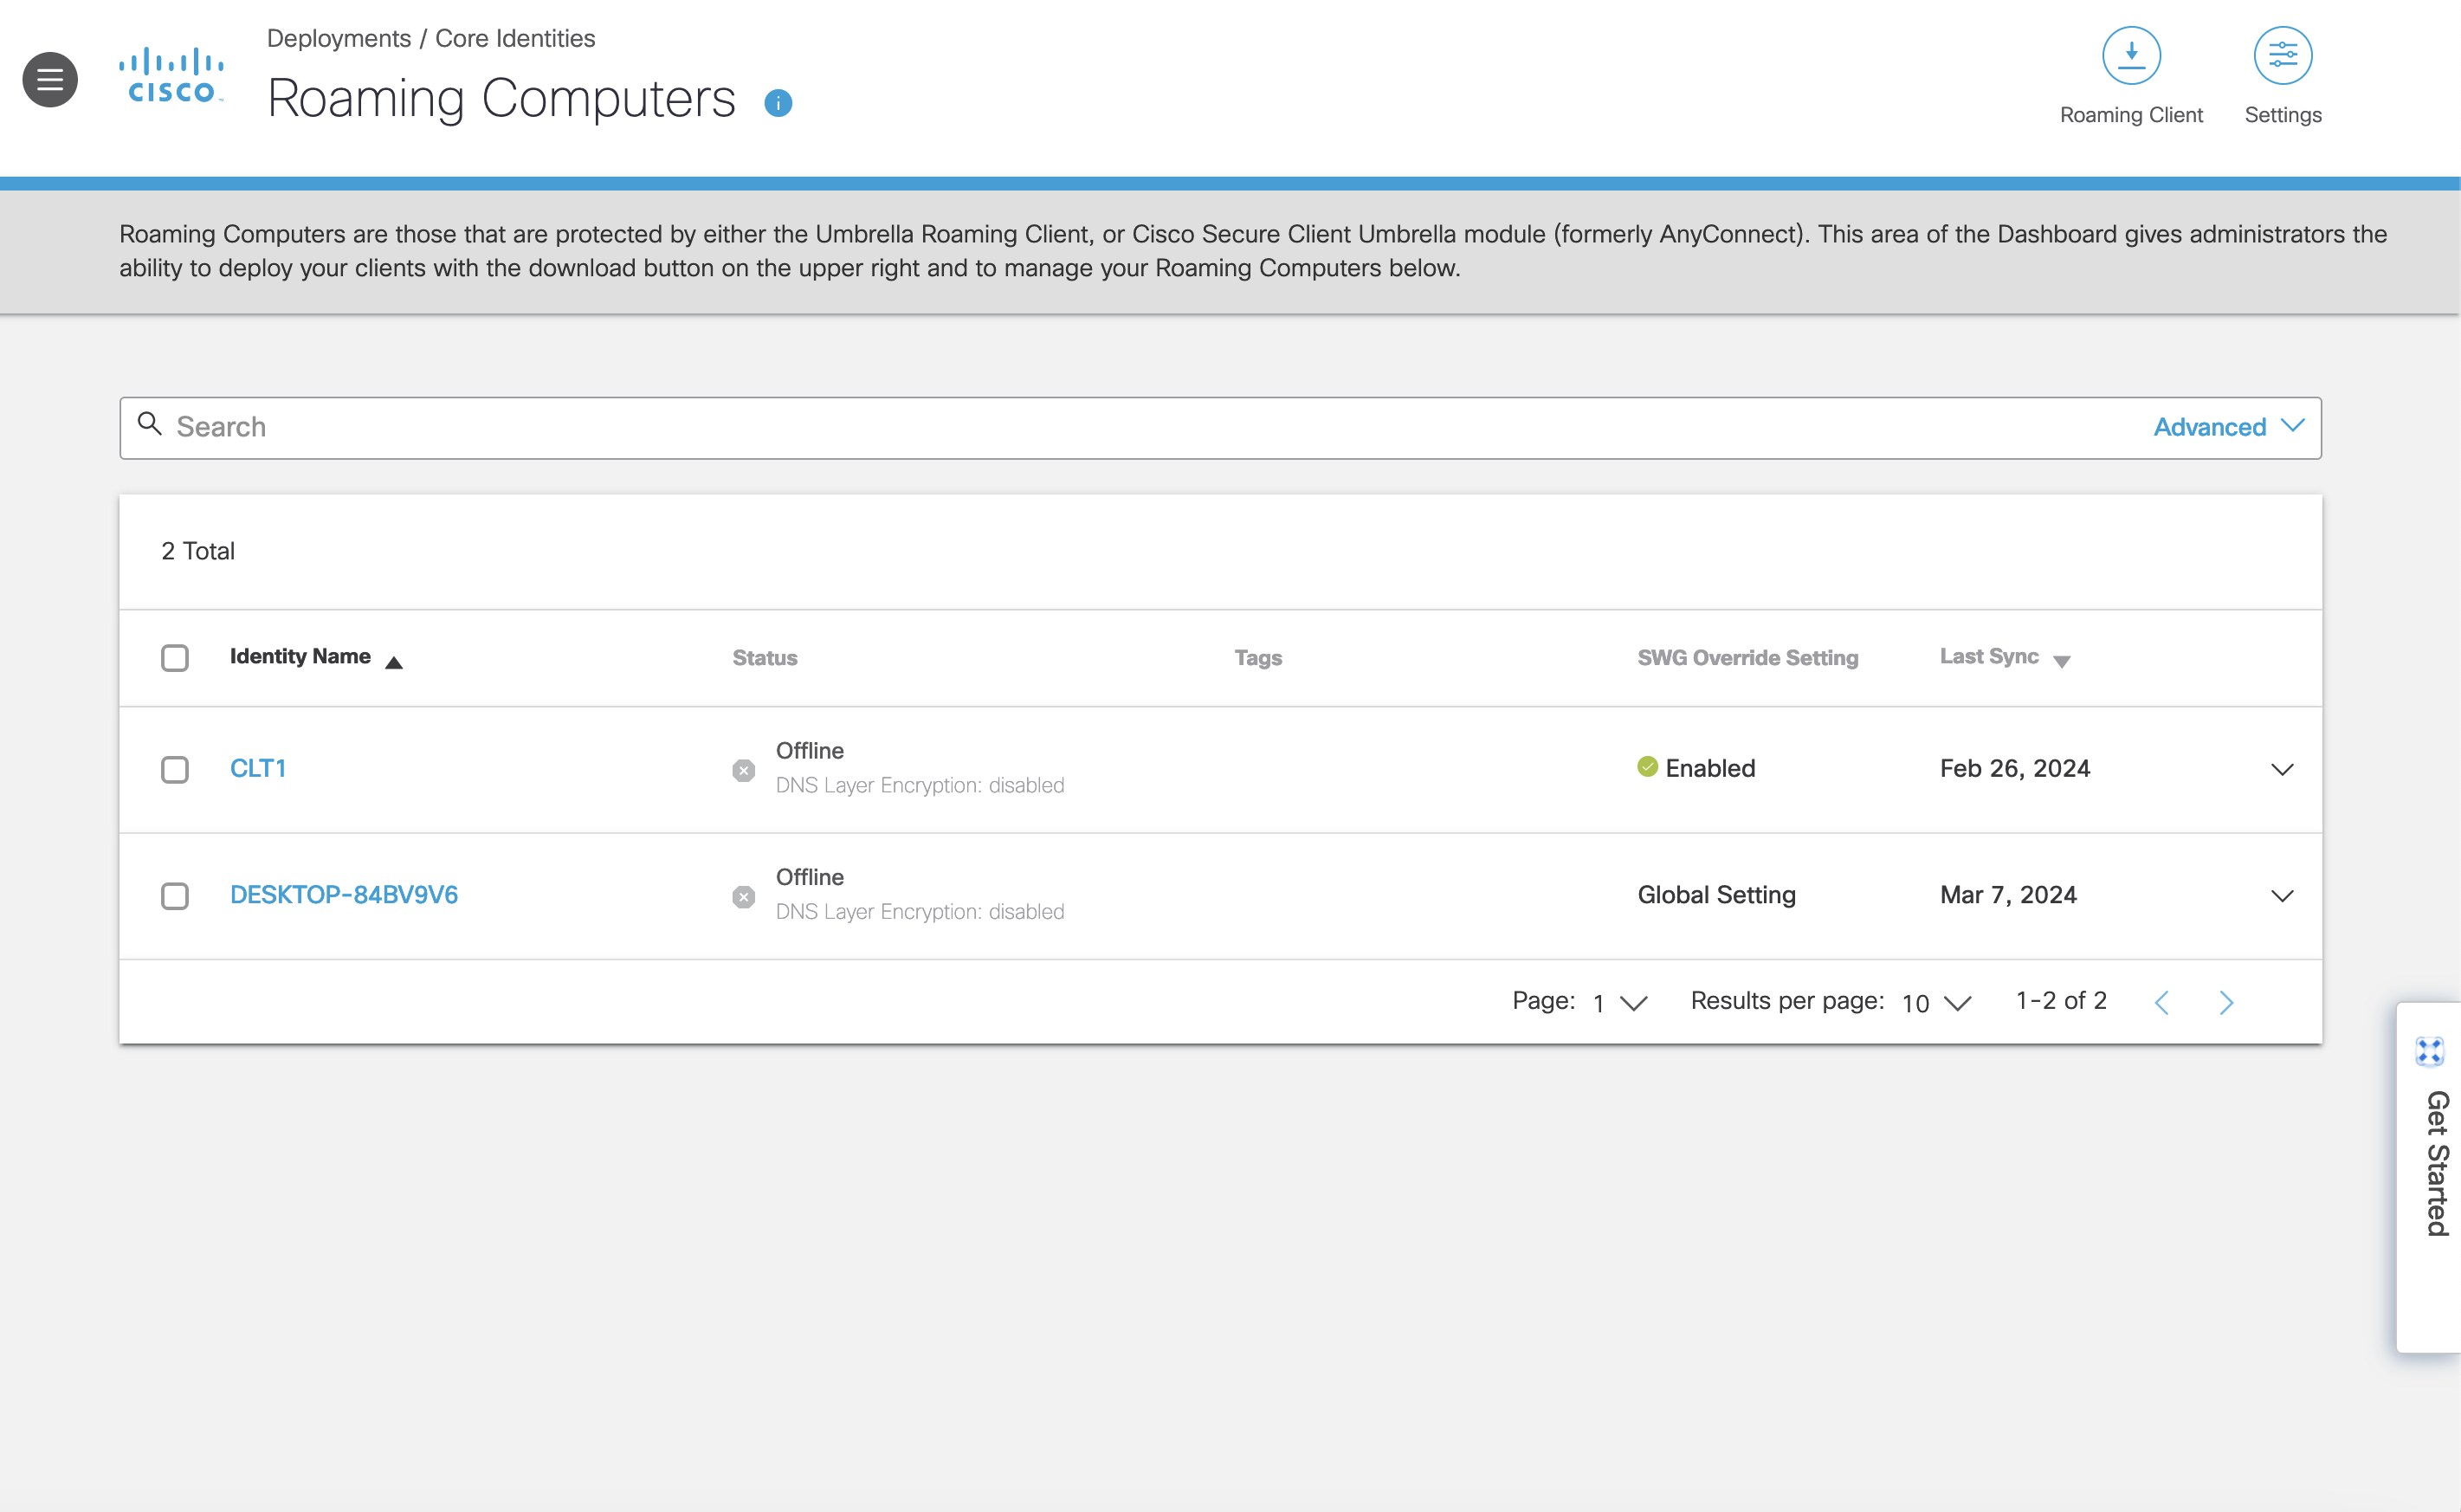 Umbrella dashboard, List of roaming computers without tags
Each tag has its unique ID, so we should note these numbers for use in the following query.
The following function helps us Get the List of roaming computers:
def getListRoamingComputers(accesToken):
url = “https://api.umbrella.com/deployments/v2/roamingcomputers“
payload = {}
headers = {
‘Accept’: ‘application/json’,
‘Content-Type’: ‘application/json’,
‘Authorization’: ‘Bearer ‘ + accessToken
}
response = requests.request(“GET”, url, headers=headers, data=payload)
print(response.text)
Expected output:
[{“originId”: 621783439,“deviceId”: “010172DCA0204CDD”,“type”: “anyconnect”,“status”: “Off”,“lastSyncStatus”: “Encrypted”,“lastSync”: “2024-02-26T15:50:55.000Z”,“appliedBundle”: 13338557,“version”: “5.0.2075”,“osVersion”: “Microsoft Windows NT 10.0.18362.0”,“osVersionName”: “Windows 10”,“name”: “CLT1”,“hasIpBlocking”: false},{“originId”: 623192385,“deviceId”: “0101920E8BE1F3AD”,“type”: “anyconnect”,“status”: “Off”,“lastSyncStatus”: “Encrypted”,“lastSync”: “2024-03-07T15:20:39.000Z”,“version”: “5.1.1”,“osVersion”: “Microsoft Windows NT 10.0.19045.0”,“osVersionName”: “Windows 10”,“name”: “DESKTOP-84BV9V6”,“hasIpBlocking”: false,“appliedBundle”: null}]
Users can iterate through the JSON list items and filter them by osVersionName, name, deviceId, etc., and record the related originId in the list that we will use to apply the related tag.
With related tag ID and roaming computers originId list, we can finally add a tag to devices, using the following function:
def addTagToDevices(tagId, deviceList, accesToken):
url = “https://api.umbrella.com/deployments/v2/tags/{}/devices”.format(tagId)
payload = json.dumps({
“addOrigins”:
})
headers = {
‘Accept’: ‘application/json’,
‘Content-Type’: ‘application/json’,
‘Authorization’: ‘Bearer ‘ + accessToken
}
response = requests.request(“POST“, url, headers=headers, data=payload)
print(response.text)
addTagToDevices(tagId, [ 621783439, 623192385 ], accesToken)
Expected output:
{
“tagId”: 90289,
“addOrigins”: [
621783439,
623192385
],
“removeOrigins”: []
}
After adding tags, let’s check the dashboard
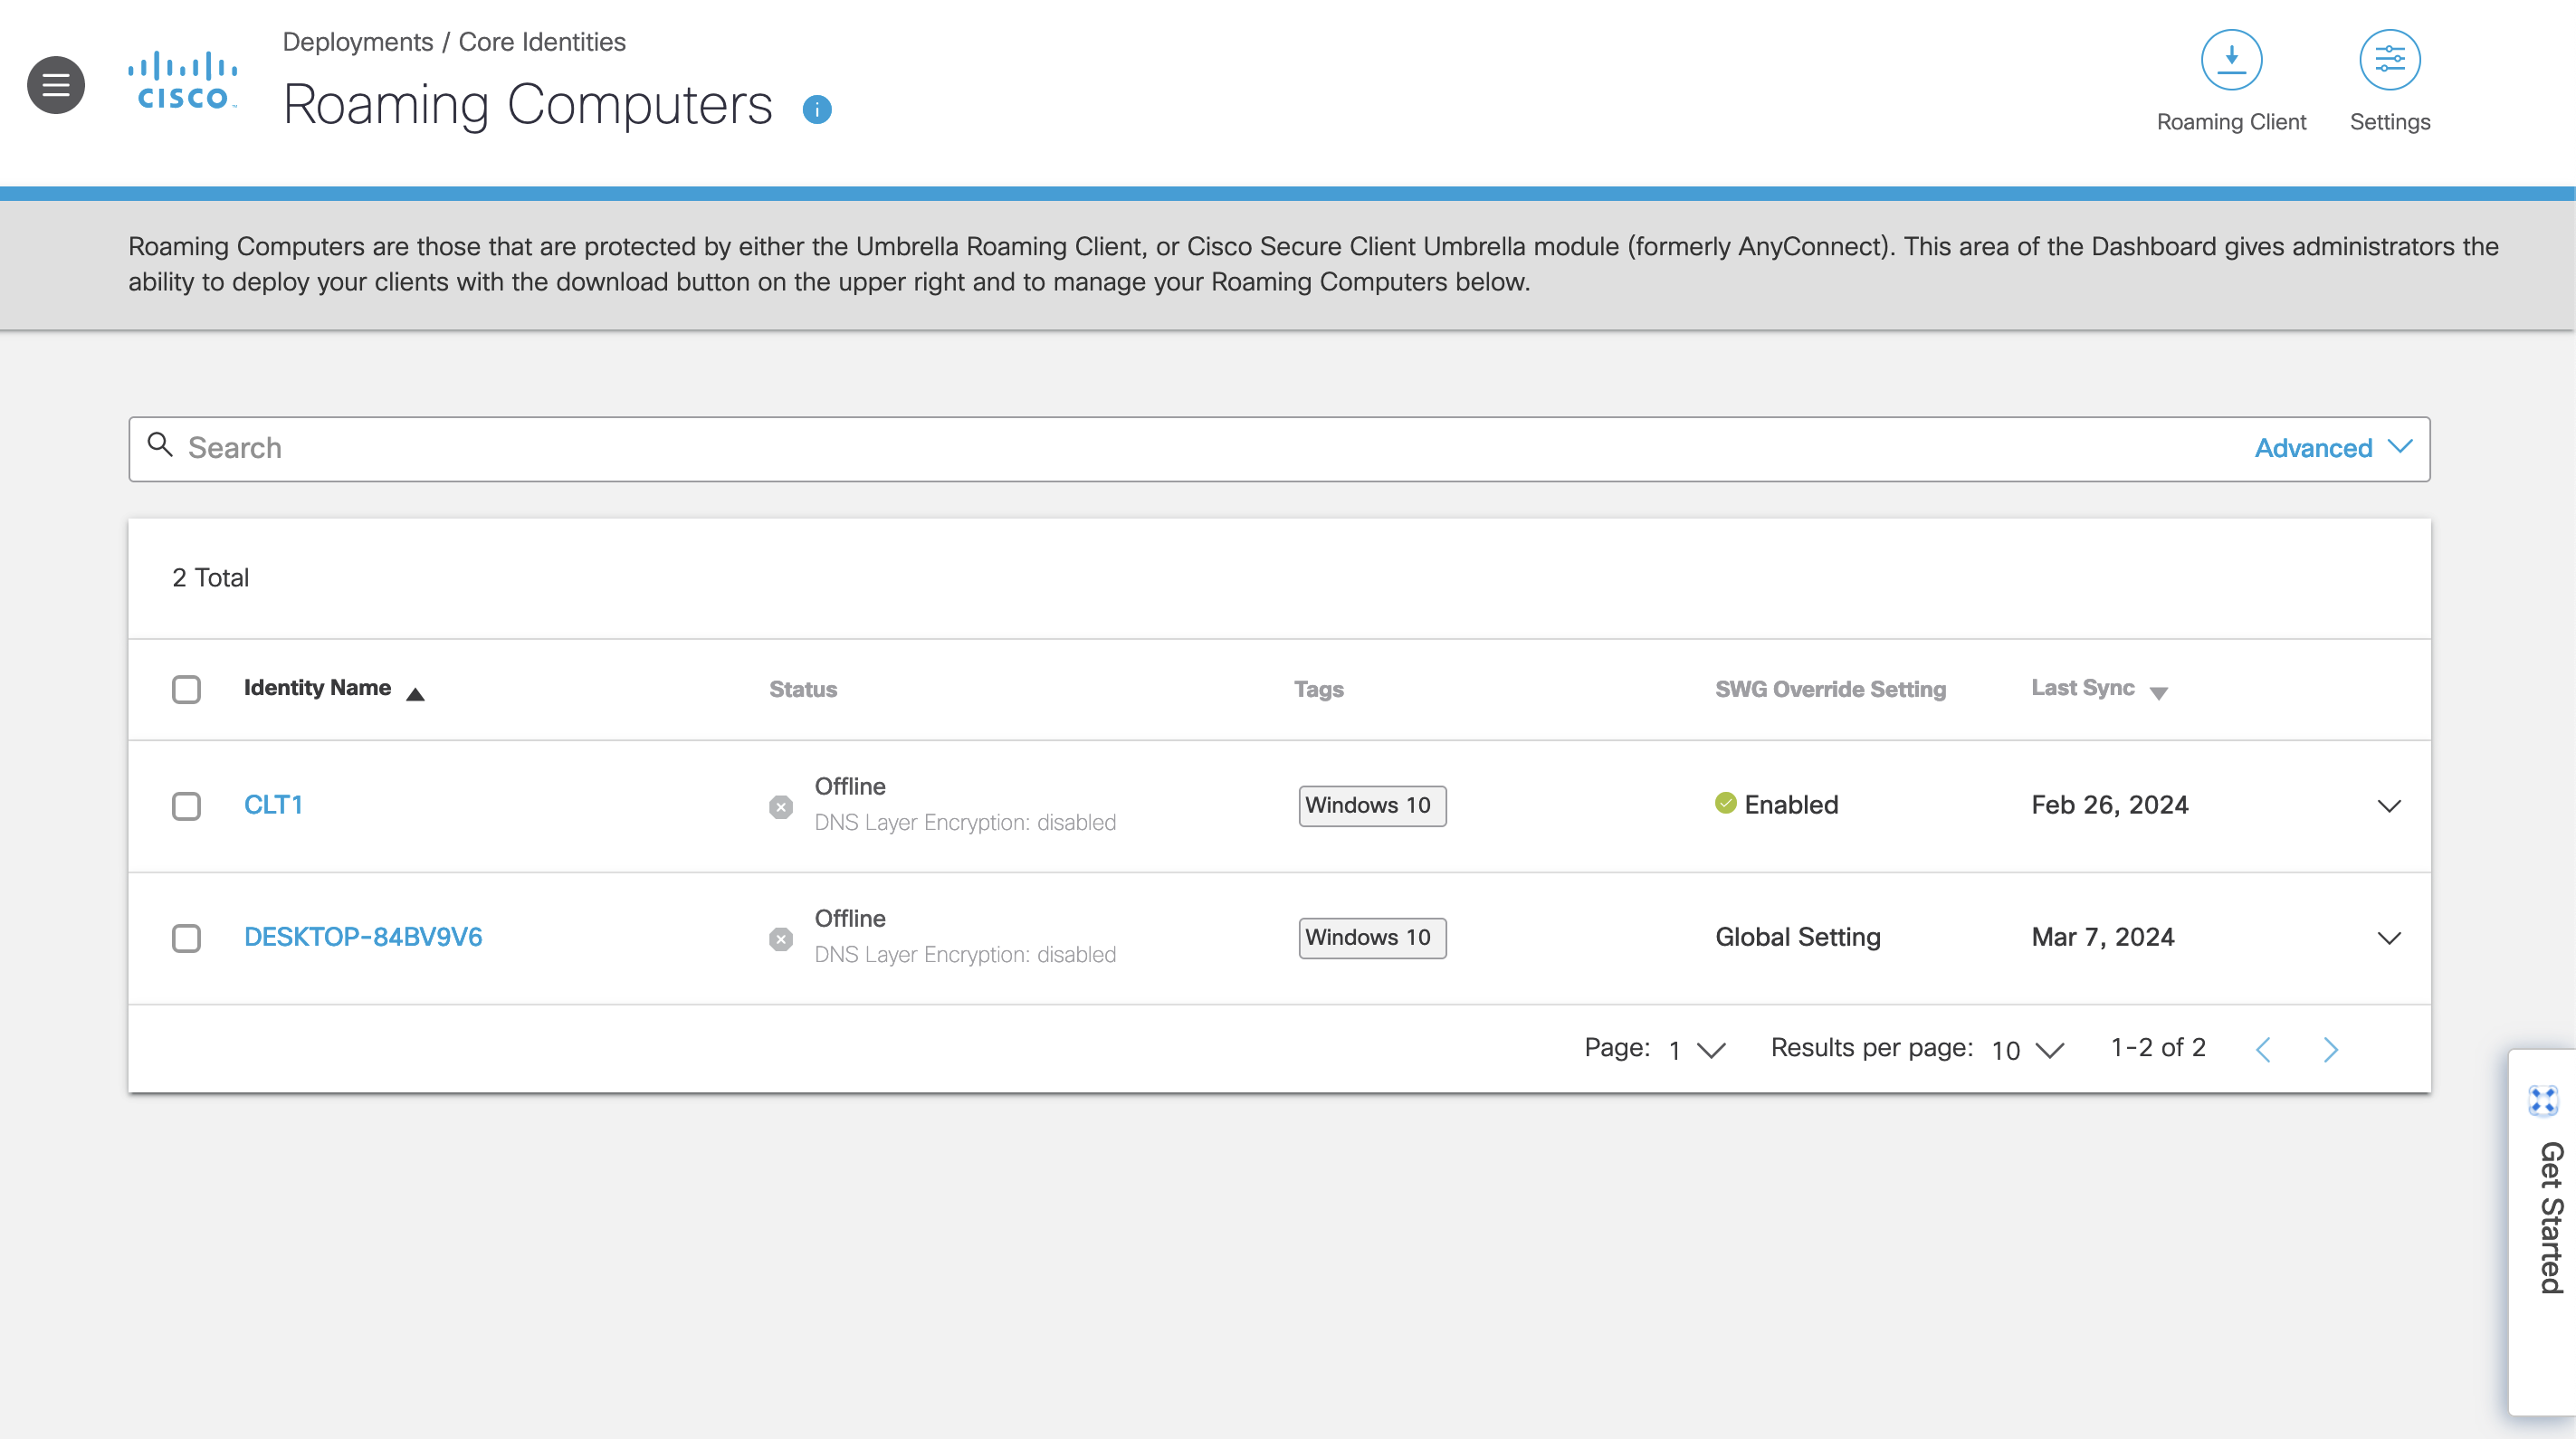 Umbrella dashboard, list of roaming computers after we add tags using API
A related tag is available to select when creating a new DNS policy.
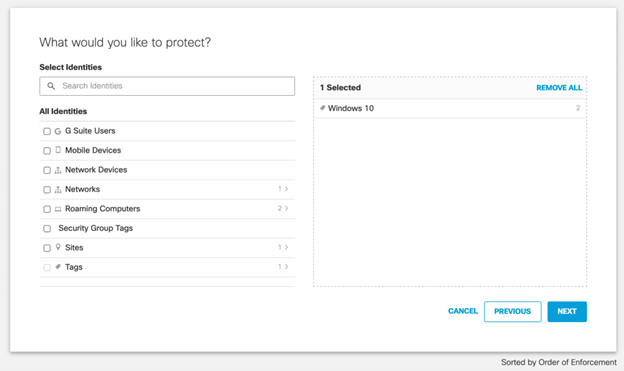
Notes:
Each roaming computer can be configured with multiple tags
A tag cannot be applied to a roaming computer at the time of roaming client installation.
You cannot delete a tag. Instead, remove a tag from a roaming computer.
Tags can be up to 40 characters long.
You can add up to 500 devices to a tag (per request).
Try these updates in the DevNet Sandbox
Give it a try! Play with these updates using the Umbrella DevNet Sandbox.
Share:
[ad_2]
Source link
